Defending Deepfake
AI 시리즈 : 딥페이크 방어 기술
오늘은 최근 딥페이크에 대응해서 어떻게 방어하는지에 대해 최신 논문 2가지를 간단히 요약하고 예시를 보여드리고자 합니다.
논문 1: GuardDoor
GuardDoor: Safeguarding Against Malicious Diffusion Editing via Protective Backdoors (arxiv.org/html/2503.03944)
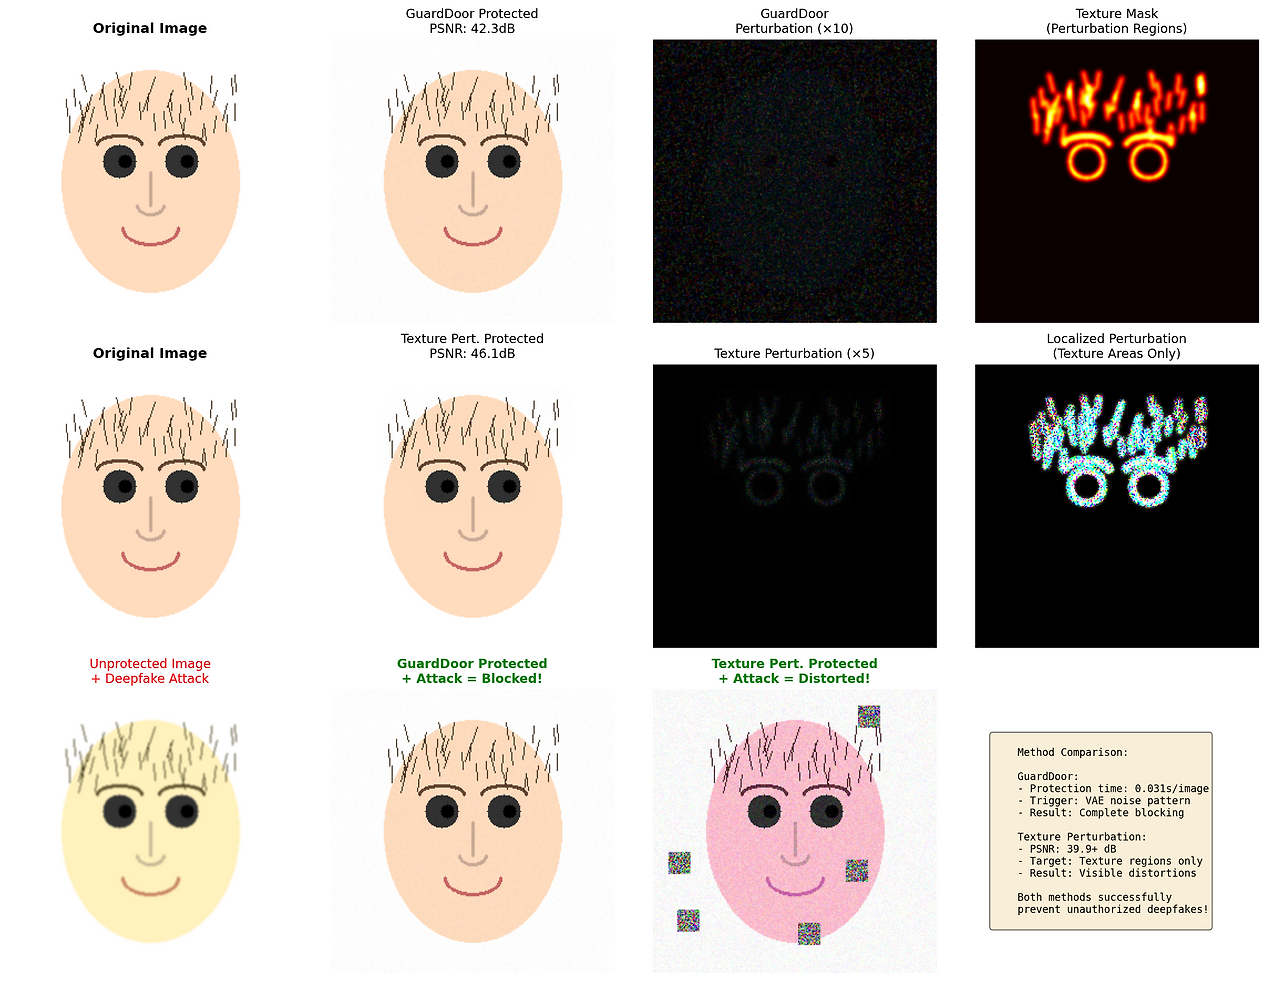
기존 적대적 섭동 방법이 JPEG 압축이나 가우시안 블러 같은 단순 이미지 전처리 작업에 취약한 문제를 해결하기 위해, 이미지 소유자와 모델 제공자 간 협력 프레임워크를 제안합니다.
작동 방식은 먼저 모델 제공자가 이미지 인코더를 파인튜닝하여 보호 백도어를 삽입하고, 사전 학습된 VAE를 통해 이미지를 재구성하면서 생기는 미세한 고주파 노이즈 패턴을 보호 트리거로 활용합니다. 이 트리거가 포함된 이미지를 편집하려고 하면 모델이 의미 없는 출력(예: 검은 이미지)을 생성하여 무단 편집을 차단합니다.
장점은 이미지당 0.031초만 소요되어 PhotoGuard(11.827초)나 EditShield(1.737초)보다 훨씬 빠르며, JPEG 압축과 DiffPure 같은 공격에도 강건합니다.
논문 2: Texture Feature Perturbation
Defending Deepfake via Texture Feature Perturbation (arxiv.org/html/2508.17315v1)
사람의 눈은 매끄러운 영역의 노이즈에 더 민감하므로, 텍스처 영역에만 선택적으로 섭동을 추가하여 시각적 품질을 유지하면서 효과적으로 딥페이크를 방어합니다.
작동 방식은 Bilateral Filter와 LBP(Local Binary Pattern)를 사용하여 얼굴의 텍스처 특징을 추출하고, Grad-CAM을 통해 모델이 주목하는 영역을 파악합니다. 이후 이중 분기 주의 전략으로 텍스처 영역에 집중된 섭동을 최적화하며, ResNet50과 ViT를 결합하여 지역적 세부사항과 전역적 의미론을 모두 고려합니다.
성능은 PSNR 39.9355로 비교 방법 중 유일하게 39dB를 초과하며, 평균 방어 성공률에서 두 번째 방법보다 42.63% 우수합니다.
실제 작동 방식 요약
GuardDoor:
원본 이미지 → VAE 재구성 → 미세한 노이즈 패턴 생성
    → 딥페이크 시도 → ❌ 검은 화면 출력

Texture Perturbation:
원본 이미지 → 텍스처 영역 감지 → 해당 영역만 섭동 추가
    → 딥페이크 시도 → ⚠️ 색상/구조 왜곡 발생
예시 코드
주의: 이는 교육 목적의 시연용 코드입니다. 실제 논문의 전체 구현은 복잡한 학습 과정을 포함합니다.
import numpy as np
import cv2
import matplotlib.pyplot as plt
from skimage.metrics import structural_similarity as ssim
from skimage.metrics import peak_signal_noise_ratio as psnr
from scipy.ndimage import gaussian_filter
import warnings
warnings.filterwarnings('ignore')


class GuardDoorSimulator:
    """GuardDoor 방식의 간소화된 시뮬레이터"""

    def __init__(self):
        self.name = "GuardDoor"

    def add_vae_trigger(self, image, strength=0.02):
        """VAE 재구성을 시뮬레이션하여 보호 트리거 추가"""
        h, w = image.shape[:2]

        content_noise = cv2.GaussianBlur(image.astype(float), (3, 3), 1.0)
        high_freq = image.astype(float) - content_noise

        noise_pattern = np.random.randn(h, w, 3) * strength * 255
        noise_pattern = gaussian_filter(noise_pattern, sigma=0.5)
        adaptive_noise = noise_pattern * (1 + np.abs(high_freq) / 255)

        protected = image.astype(float) + adaptive_noise
        return np.clip(protected, 0, 255).astype(np.uint8)

    def simulate_deepfake_attack(self, image, attack_type="face_swap"):
        """딥페이크 공격 시뮬레이션"""
        if attack_type == "face_swap":
            hsv = cv2.cvtColor(image, cv2.COLOR_RGB2HSV)
            hsv[:, :, 0] = (hsv[:, :, 0] + 10) % 180
            attacked = cv2.cvtColor(hsv, cv2.COLOR_HSV2RGB)
            return cv2.GaussianBlur(attacked, (3, 3), 1.0)
        elif attack_type == "age_change":
            return cv2.convertScaleAbs(image, alpha=1.2, beta=10)
        return image

    def detect_trigger_and_disrupt(self, protected_image, original_image):
        """보호 트리거를 감지하고 편집을 방해"""
        diff = cv2.absdiff(protected_image, original_image)
        trigger_strength = np.mean(diff)

        if trigger_strength > 2:
            h, w = protected_image.shape[:2]
            disrupted = np.random.randint(0, 50, (h, w, 3), dtype=np.uint8)
            return disrupted, True

        return protected_image, False


class TexturePerturbationSimulator:
    """Texture Feature Perturbation 방식의 간소화된 시뮬레이터"""

    def __init__(self):
        self.name = "Texture Perturbation"

    def extract_texture_regions(self, image):
        """LBP를 사용하여 텍스처 영역 추출"""
        gray = cv2.cvtColor(image, cv2.COLOR_RGB2GRAY)
        filtered = cv2.bilateralFilter(gray, d=9, sigmaColor=75, sigmaSpace=75)

        sobelx = cv2.Sobel(filtered, cv2.CV_64F, 1, 0, ksize=3)
        sobely = cv2.Sobel(filtered, cv2.CV_64F, 0, 1, ksize=3)
        texture_map = np.sqrt(sobelx**2 + sobely**2)
        texture_map = (texture_map - texture_map.min()) / (texture_map.max() - texture_map.min())

        texture_mask = (texture_map > 0.3).astype(float)
        return gaussian_filter(texture_mask, sigma=2.0)

    def add_texture_perturbation(self, image, strength=15):
        """텍스처 영역에만 선택적으로 섭동 추가"""
        texture_mask = self.extract_texture_regions(image)
        texture_mask_3ch = np.stack([texture_mask] * 3, axis=2)

        h, w = image.shape[:2]
        perturbation = np.random.randn(h, w, 3) * strength
        adaptive_perturbation = perturbation * texture_mask_3ch

        protected = image.astype(float) + adaptive_perturbation
        return np.clip(protected, 0, 255).astype(np.uint8), texture_mask

    def simulate_deepfake_with_distortion(self, protected_image):
        """보호된 이미지에 딥페이크 적용 시 왜곡 시뮬레이션"""
        hsv = cv2.cvtColor(protected_image, cv2.COLOR_RGB2HSV).astype(np.int16)
        hsv[:, :, 0] = (hsv[:, :, 0] + np.random.randint(-30, 30)) % 180
        distorted = cv2.cvtColor(hsv.astype(np.uint8), cv2.COLOR_HSV2RGB)

        noise = np.random.randint(-20, 20, distorted.shape, dtype=np.int16)
        distorted = np.clip(distorted.astype(np.int16) + noise, 0, 255).astype(np.uint8)

        h, w = distorted.shape[:2]
        for _ in range(5):
            x, y = np.random.randint(0, w-20), np.random.randint(0, h-20)
            distorted[y:y+20, x:x+20] = np.random.randint(0, 255, (20, 20, 3), dtype=np.uint8)

        return distorted
실행 결과 시각화
마무리
위의 코드는 앞에서 설명드린 두 가지 논문에 대해 핵심 아이디어를 Python으로 시연한 내용입니다. 사실 아직 이 분야를 공부한 지 포스트 기준으로도 실제 기준으로도 한 달 반을 넘지 못한 문외한이다 보니 실제로 연구하시는 분들에 비해 많이 부족합니다.
코드에서 보시다시피, 단순하게 그린 합성 얼굴 이미지에 딥페이크를 가장한 색깔 바꾸기 공격 정도로 방법론을 검증한 것을 볼 수 있습니다. 제 전공은 언어 모델이었지 이미지가 전혀 아니었기 때문에 이미지 분야는 정말 잘 모릅니다. 그래도 공부해보고 싶은 마음이 들어서 이 포스트를 작성하게 되었습니다. 이 포스트를 보고 딥페이크 방어 기술에 관심이 생기신 분들께 조금이나마 도움이 되었으면 좋겠습니다.
오늘도 읽어주셔서 감사합니다.